This guide will explain two methods:
- Azure AD inbound federation as a Social Provider
- Azure AD as an enterprise IdP by using OpenID-Connect (OIDC)
Finally, this guide explains how to set up custom claims and a group claim with the enterprise IdP OIDC integration.
Prerequisites
This guide assumes that a working and correct licenced tenant on Azure AD and Okta is available. How to set up a new tenant for Azure AD or Okta is not part of this guide.
Inbound Federation with Azure AD as social provider
Azure AD can be set up as a social provider (like Facebook or Google) in Okta. With this setup users from different Azure tenants can sign up and log in to Okta.
This can be used both for social login use cases (e.g. login with Outlook.com account) and with use cases where several Azure ADs from different customers need to be connected.
Note: This setup does not support custom claims or the group claim from Azure. This comes due the fact that you can't set up custom claims, by allowing all Azure tenants from various customers at the same time.
Register an app on Azure AD
- Go to https://portal.azure.com and navigate to:
Azure Active Directory → App registrations - In the top menu click on New registration
- Register a new app:
- Type in a name for your connection
- Choose in the section "Supported account types" Accounts in any organizational directory (Any Azure AD directory - Multi-Tenant) and personal Microsoft accounts (e.g. Skype, Xbox)
Note: Since we set up Azure AD as Social provider for Okta, this setting is necessary - Choose Web and provide a redirect URL in this format: https://<YourOktaURL>/oauth2/v1/authorize/callback
- Click on Register

- Write down the Application (client) ID
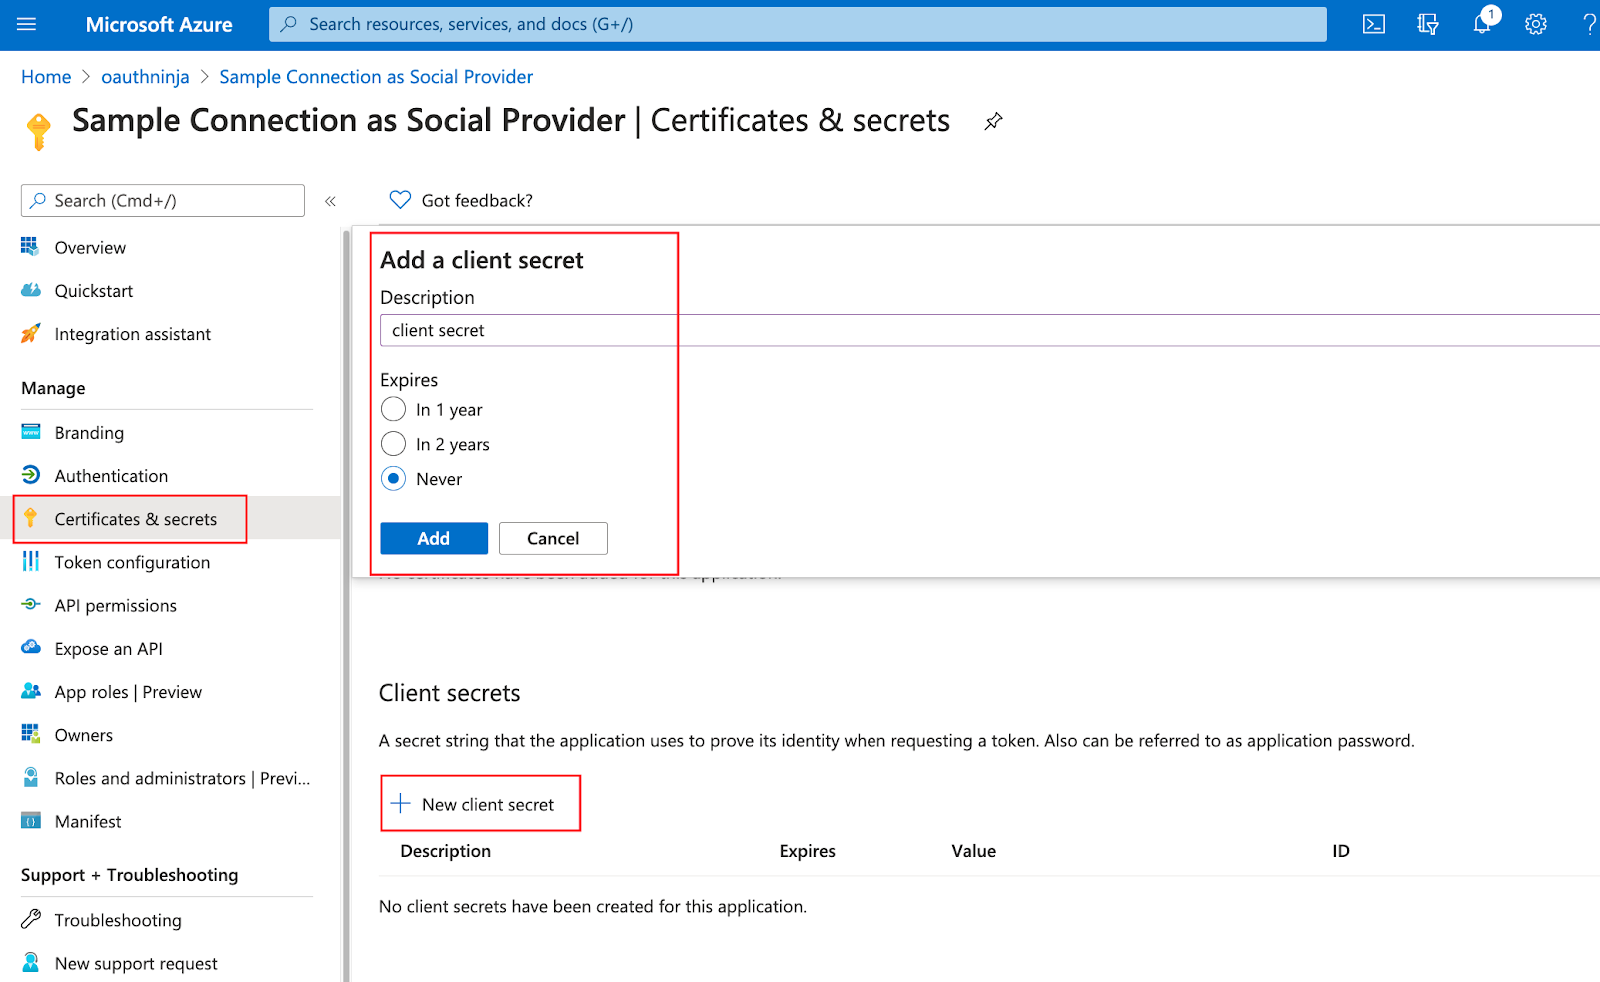
- Create a Client Secret:
- Go to Certificates & Secrets
- In the section "Client secrets" click on + New client secret
- Add a description and choose an expiration time
- Click on Add
- Write down the value for your newly created client secret
Set up inbound federation in Okta
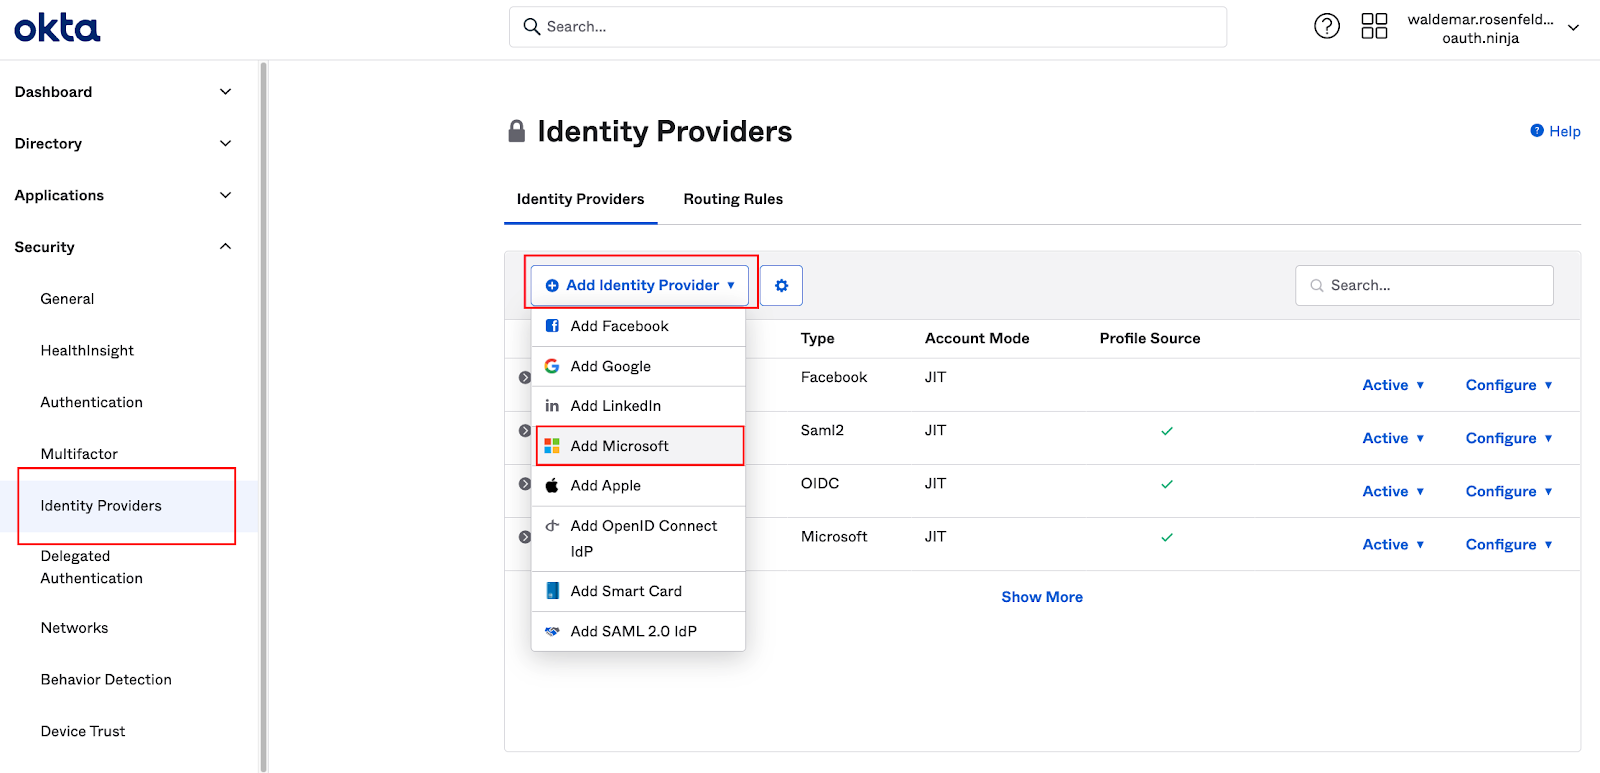
- Go to the admin UI of Okta
- Go to Security → Identity Providers
- Click on + Add Identity Provider
- Choose Add Microsoft
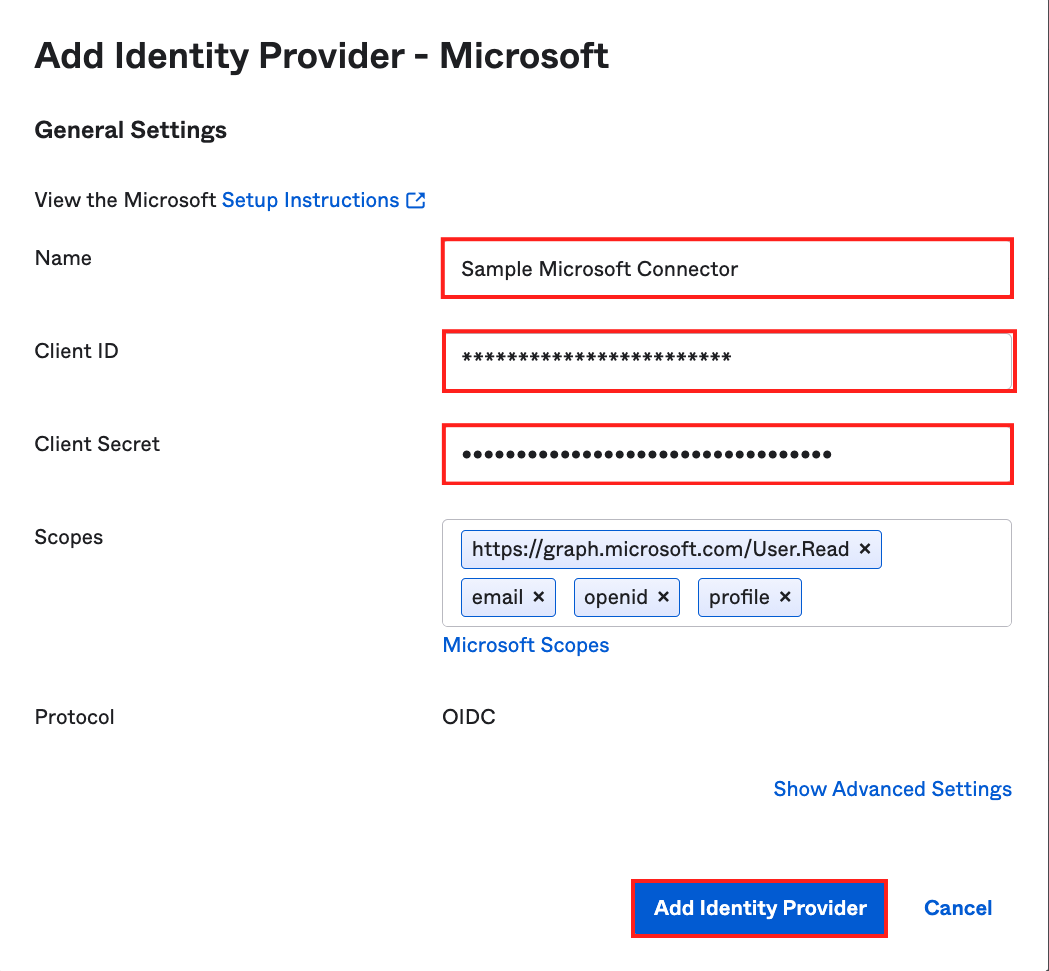
- Set up the IdP
- Provide a Name
- Add the client id previous section
- Add the client secret from previous section
- Scopes can stay the same
- Click on Add Identity Provider
Inbound Federation with Azure AD as enterprise IdP with OIDC
Azure AD can, like in the previous section, be used as an enterprise IdP. This can be done with the generic OIDC connector for Inbound Federation in Okta. The following section also explains how to set up custom claims and the group claim to communicate additional information from Azure AD to Okta’s Universal Directory.
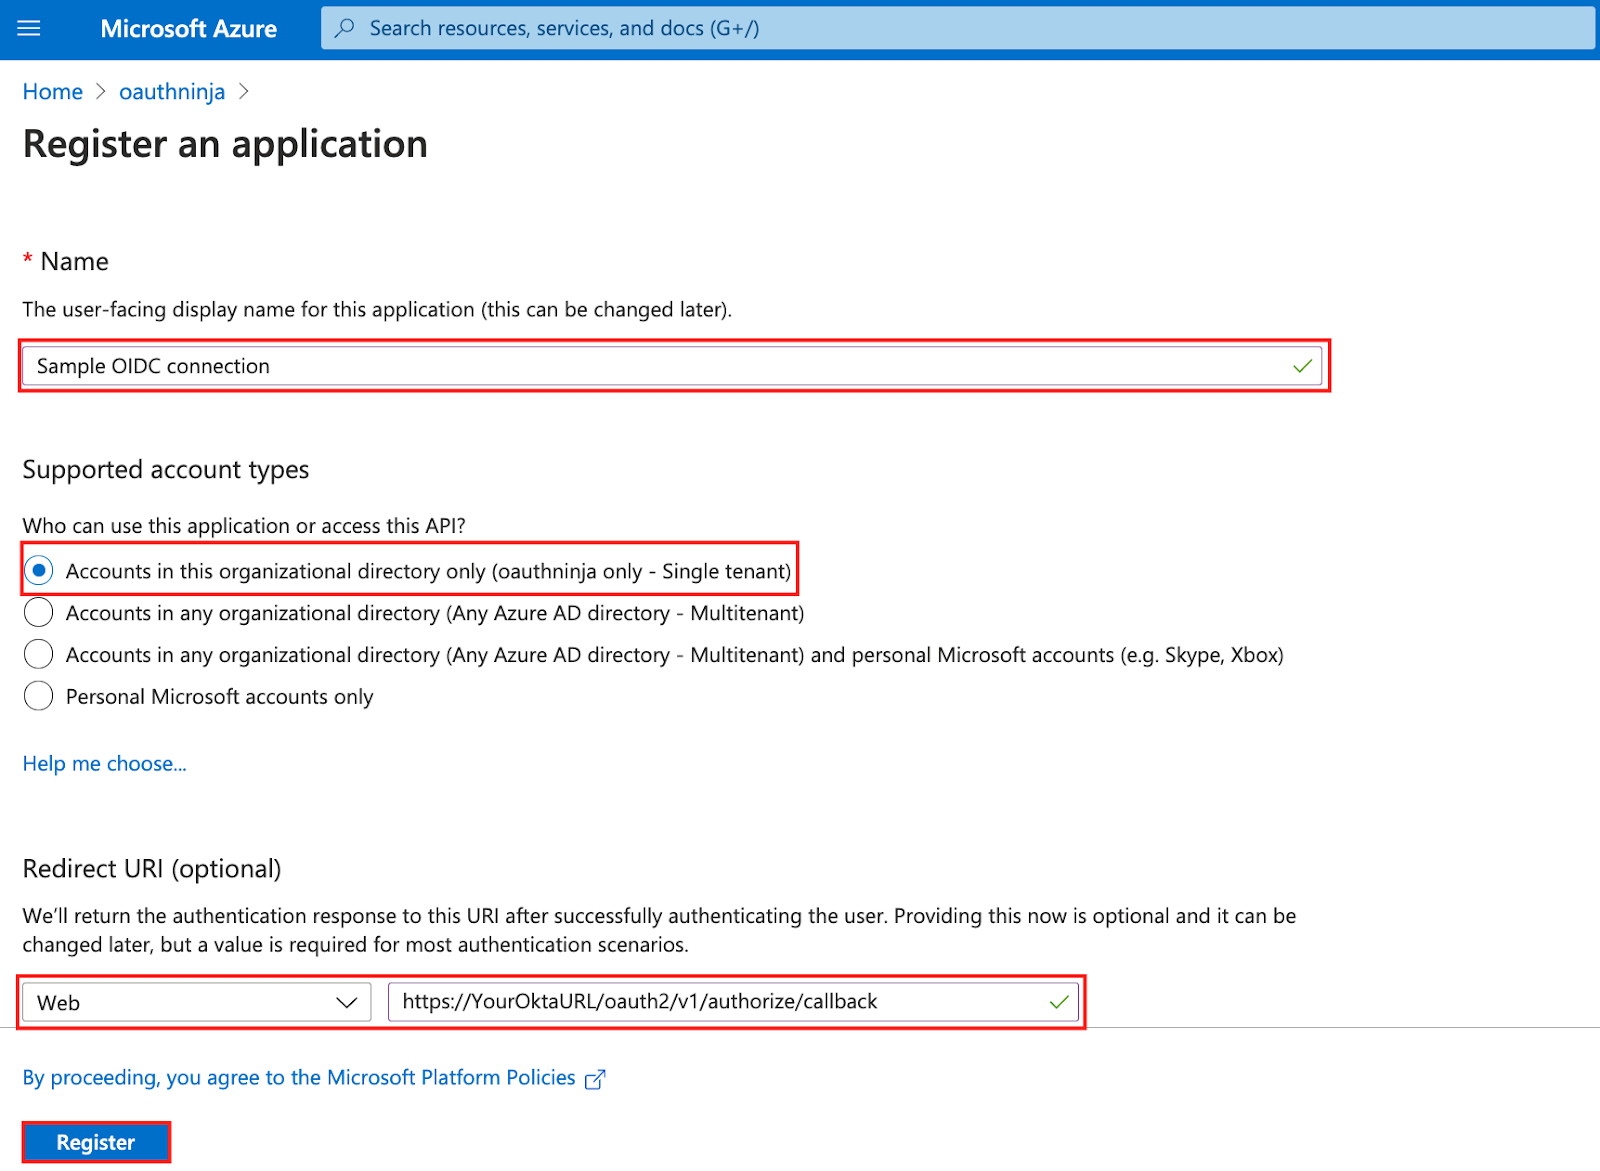
Register an app on Azure AD
- Go to https://portal.azure.com and navigate to:
Azure Active Directory → App registrations - In the top menu click on New registration
- Register a new app:
- Type in a name for your connection
- Choose in the section "Supported account types" Accounts in this organizational directory only (<yourAzureName> only - Single tenant)
Note: Since we set up Azure AD as an enterprise IdP for Okta, this setting is necessary - Choose Web and provide a redirect URL in this format: https://<YourOktaURL>/oauth2/v1/authorize/callback
- Click on Register
- Write down the Application (client) ID
- Write down the Directory (tenant) ID
- Create a Client Secret:
- Go to Certificates & Secrets
- In the section "Client secrets" click on + New client secret
- Add a description and choose an expiration time
- Click on Add
- Write down the value for your newly created client secret
Set up some custom claims to send to Okta:
- Go to Token configuration in the left menu
- Click on + Add optional claim
- Choose Token: ID
- Select:
- family_name
- given_name
- upn
- Click on Add
- Choose Turn on the Microsoft Graph profile permission (required for claims to appear in token).
- Click on Add


Note: If you don't set Okta to have the first and last name to be mandatory, you can remove the given_name and familiy_name.
Set up inbound federation in Okta
- Go to Security → Identity Providers
- Click on + Add Identity Provider
- Choose Add OpenID Connect IdP
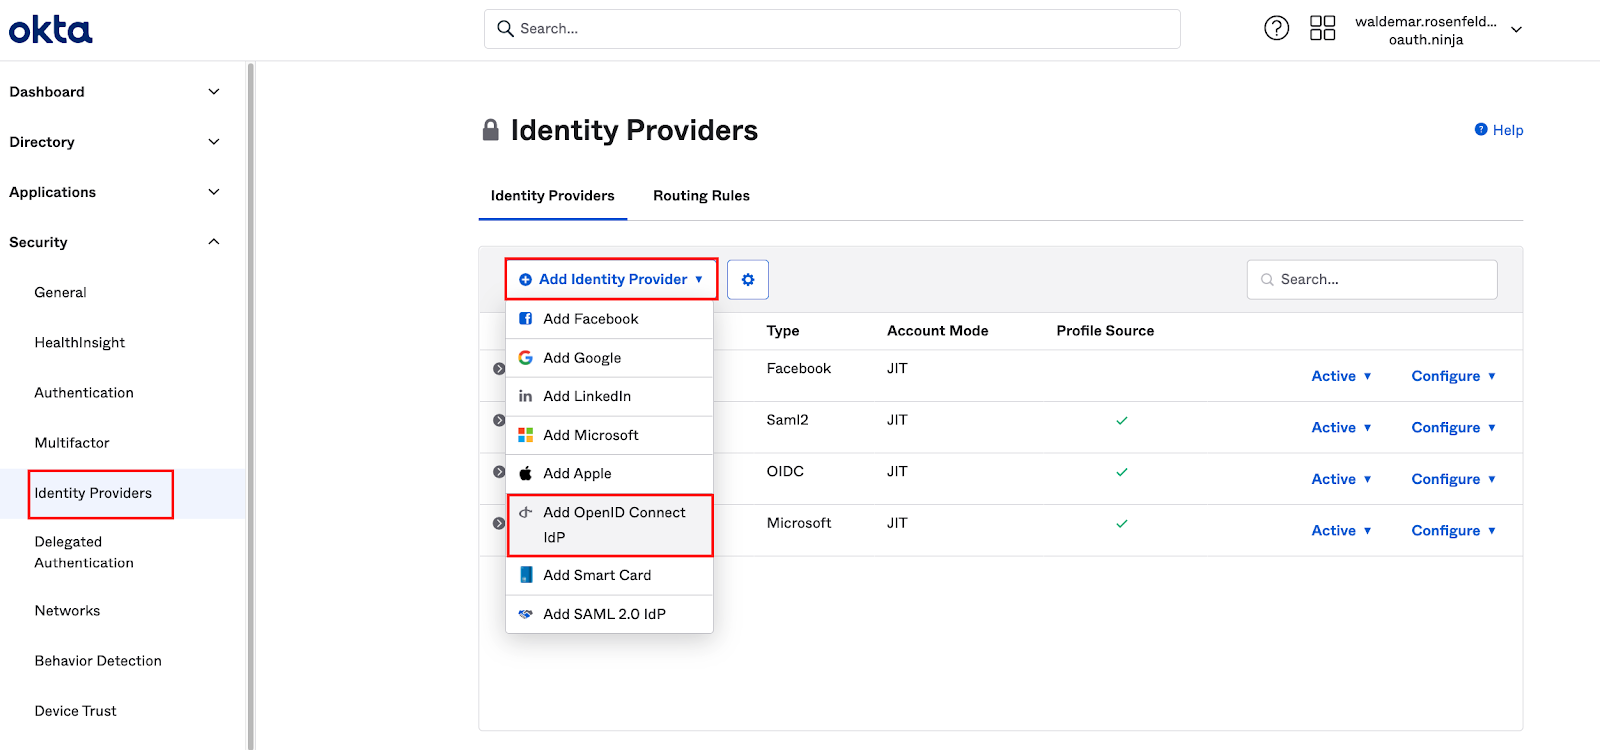
- Set up the IdP
- Provide a Name
- Add the client id from the previous section
- Add the client secret from the previous section
- Scopes can stay the same (or change if necessary)
- Add the following Endpoints (replace the placeholder with the tenant id from the previous section):
- Issuer: https://login.microsoftonline.com/<AzureTenantID>/v2.0
- Authorization endpoint: https://login.microsoftonline.com/<AzureTenantID>/oauth2/v2.0/authorize
- Token endpoint: https://login.microsoftonline.com/<AzureTenantID>/oauth2/v2.0/token
- JWKS endpoint: https://login.microsoftonline.com/<AzureTenantID>/discovery/v2.0/keys
- Userinfo endpoint: let it empty
Click on Add Identity Provider

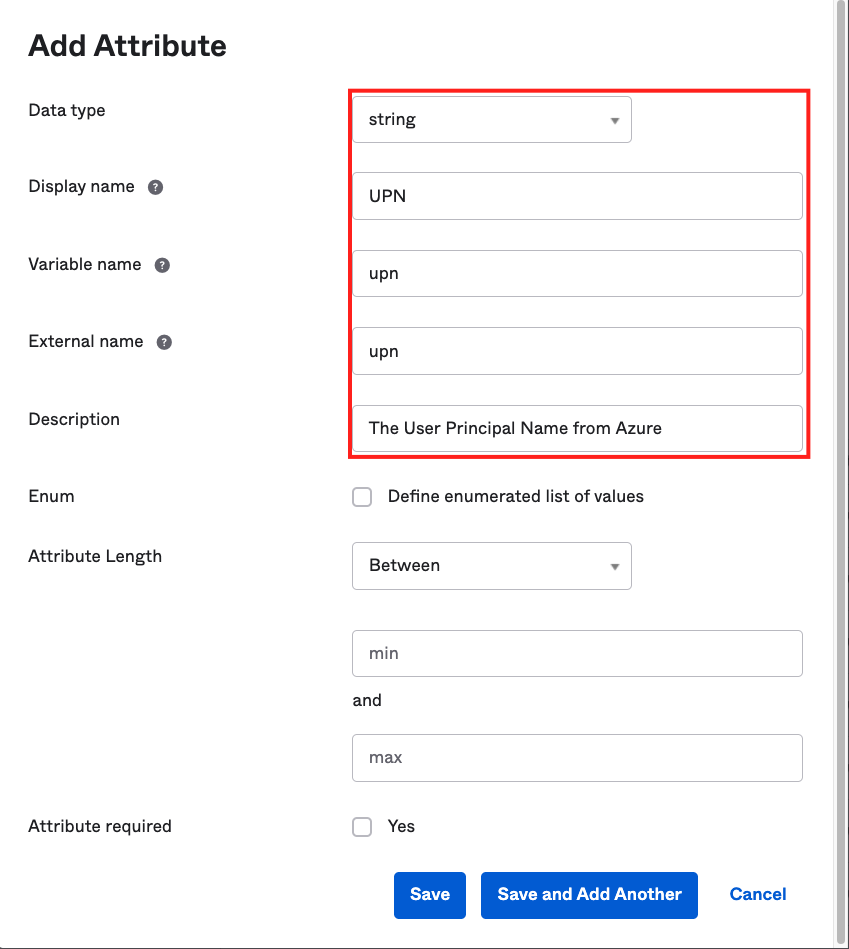
Optional: If you don't have an email stored in Azure or want to use instead of the UPN, do the following:
- Click on your newly created Identity Provider Configure → Edit Profile and Mappings
- Click on + Add Attribute
- Add the following attribute:
- Data type: string
- Display name: UPN
- Variable name: upn
- External name: upn
- Description: The User Principal Name from Azure
- Click on Save
- Click on Mappings
- Change the two mappings like in the screenshot below:
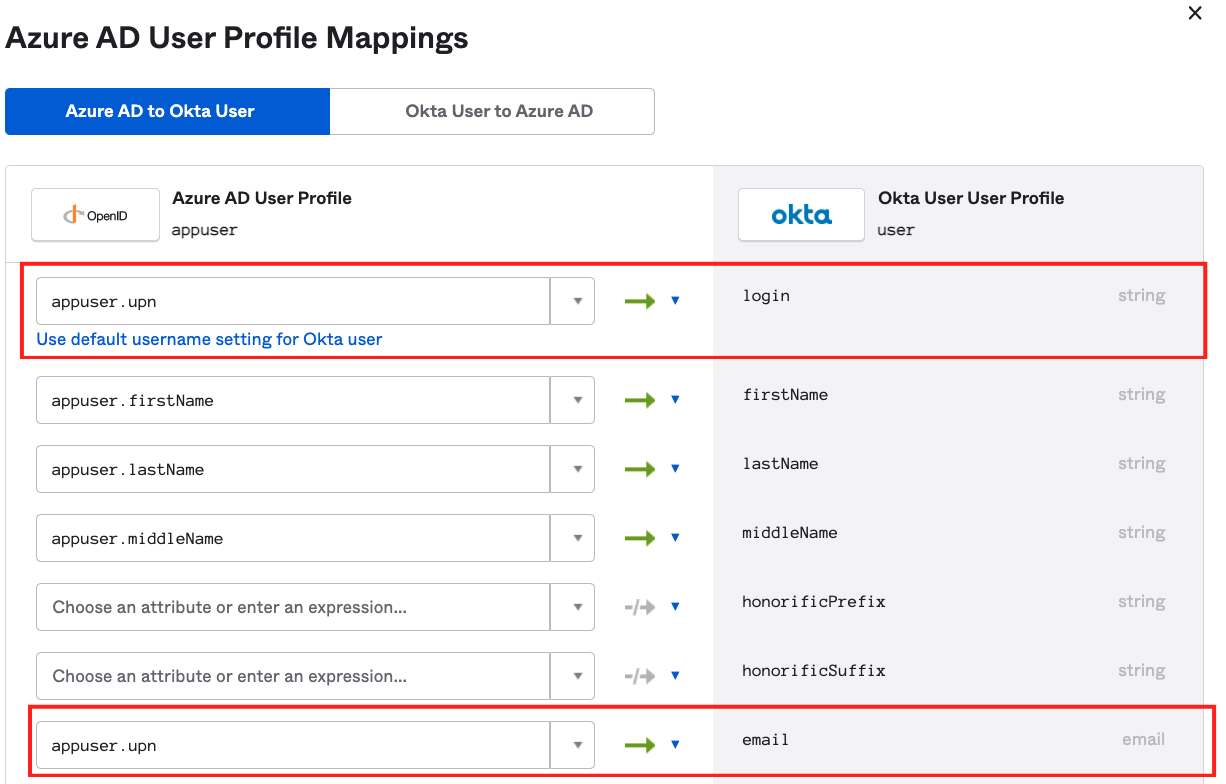
Note: If you have the email address stored in Azure, you don't need to change the mapping for the email attribute.
- Go back to Security -> Identity Providers
- Click on your created Azure AD connection on Configure → Configure Identity Provider
- Click on Show Advanced Settings in the bottom right corner
- Change the value in IdP Username to idpuser.upn
- Save your configuration by clicking on Update Identity Provider

Using custom claims and group claim with Azure AD and OIDC
Sometimes it is necessary to add additional information from Azure AD as claims, to store this information in UD (e.g. birthday or title). This can be done by inserting custom claims into the token, which should be sent to Okta.
Additionally it is possible to send group memberships in the group claim to Okta, to e.g. synchronize role information.
Add custom claims and add group claim in Azure AD
- Go to https://portal.azure.com and navigate to:
Azure Active Directory → App registrations - Choose your App
- Go to Token configuration
- Click on + Add optional claim
- Choose Token type ID
- Choose the claim you want to add in UD
- Click on Add

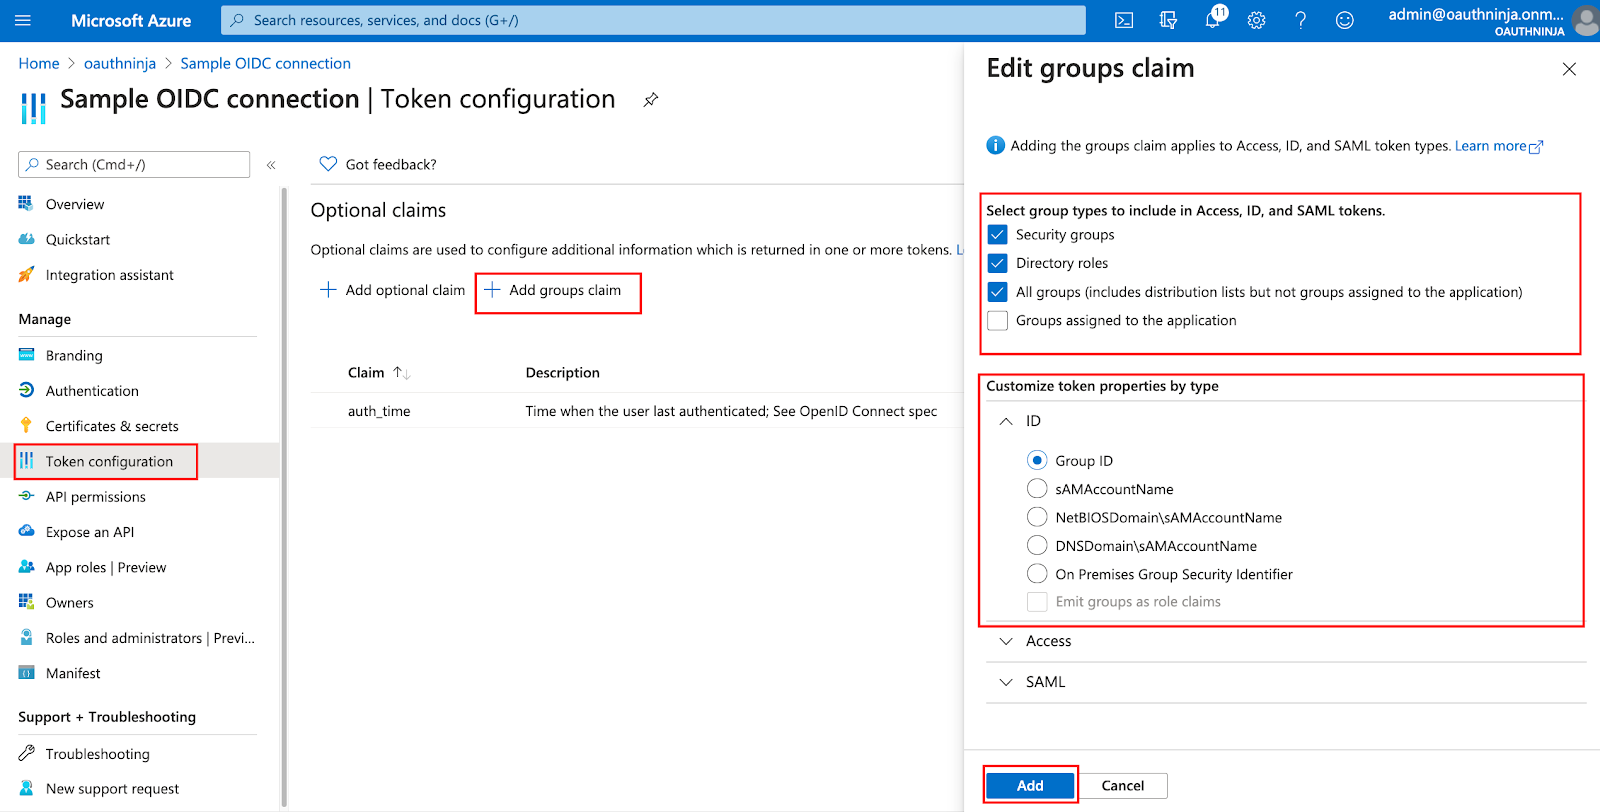
- If you want to add group memberships, click on + Add groups claim
- Select which groups you want to add
- Verify, that Group ID is selected in the section ID
- Click on Add
Note: Azure will add only the internal group id into the token and not the display name
Set up Okta to store custom claims in UD
- Go to Security → Identity Provider
- In your Azure AD IdP click on Configure → Edit Profile and Mappings
- For every custom claim do the following
- Click on + Add Attribute
- Data type need to be the same name like in Azure
- Display name can be custom
- Variable name can be custom
- External name need to be the same name like in Azure
- Click on Save
- Optional: If you want to also store this information in the default Okta user profile add a mapping:
- Click on Mappings
- Add the mapping by editing the value on the left side
Set up Okta to store group ids in UD and assign to Okta groups
- Go to Security → Identity Provider
- In your Azure AD IdP click on Configure → Edit Profile and Mappings
- Add an attribute for groups
- Click on + Add Attribute
- Data type: string array
- Display name: Azure AD groups
- Variable name: groups
- External name: groups
- Click on Save
- Store this information in the default Okta user profile:
- Click on Mappings
- Add the mapping by editing the value on the left side
- Appuser.groups → azure_groups
Note: You need to create this attribute before in the default Okta user profile as well

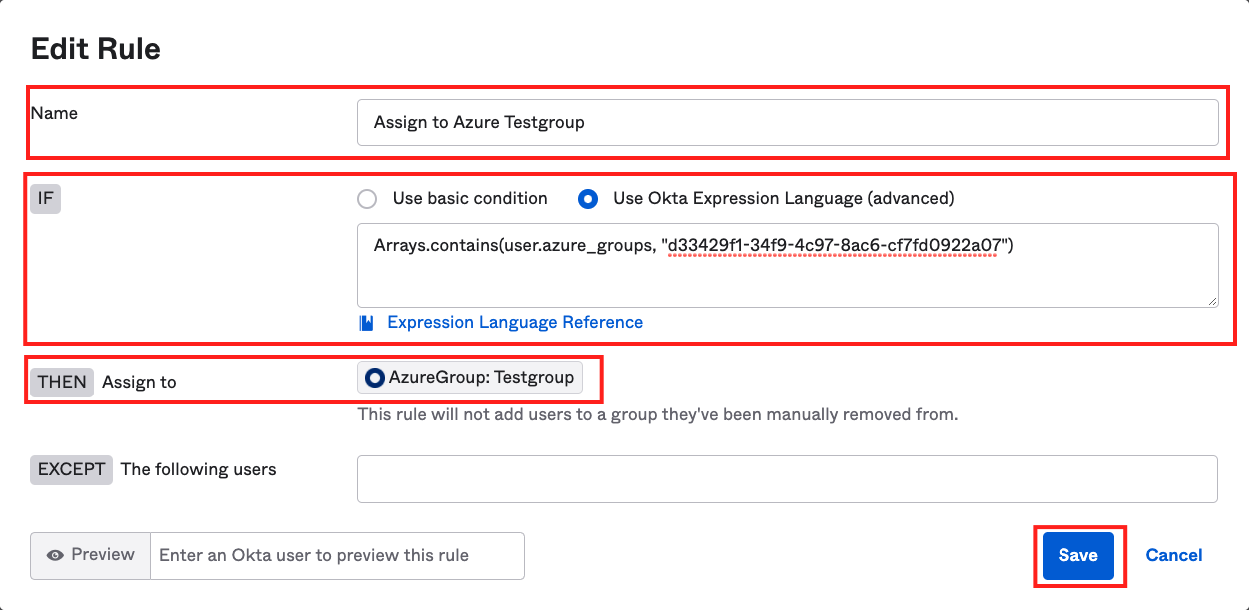
Optional: If you want to automatically add a User to an Okta group, you can use Group Rules for this:
- Go to Directory → Groups → Rules
- Click on + Add Rule
- Name: A name for this rule
- IF: Use Okta Expression Language (advanced)
- Value: Arrays.contains(user.azure_groups, "AzureADGroupID")
- Change the placeholder with the internal Azure AD group ID you want to use
- Assign to: The group you want to assign
- Click on Save
- On your newly created Rule, click on Actions → Activate