


A custom hosted sign-in widget from Okta is the perfect way to both reduce development effort, by using a library with a ton of pre-existing features, and at the same time having full flexibility on design and configuration. Using a custom hosted solution typically comes with the need to redirect a user to a custom page. Redirection to a custom page is needed for example after authentication. Due to the necessary redirect to an external page for e.g. social authentication, the redirect back to the custom page doesn't always work as expected. Sometimes the user ends up in the Okta End User Dashboard. This leads to confusion for the user and so a bad user experience.
This guide will show you:
- How to set up a sample application with a self hosted sign-in widget
- Configure the target redirect after social authentication (e.g. with Facebook or Apple)
- Configure the target redirect with the IDP discovery feature
- Set up custom redirect targets for emails (e.g. verification email)
Prerequisites
To work with this guide, you need to have the following:
- An Okta Tenant. To request an Okta tenant go to https://developer.okta.com/signup/
- For the section with the social authentication, you need to setup a social authentication, as described at https://developer.okta.com/docs/guides/add-an-external-idp/
- A good text editor, such as Visual Studio Code
If you are using the example with NodeJS, you need also a recent version of Node.js and git downloaded and installed
Setup sample application with custom login page
For this example we will use the Okta + NodeJS + Express sample with custom login page: https://github.com/okta/samples-nodejs-express-4/tree/master/custom-login
Start deployment with:
git clone https://github.com/okta/samples-nodejs-express-4.git
cd samples-nodejs-express-4/
npm install
In your Okta Admin Dashboard create a new OIDC app by navigating to Applications > Add Application > select Web, and click Next. Fill in the following values:
- Name: Node.js Login
- Base URI: http://localhost:8080
- Login redirect URI: http://localhost:8080/authorization-code/callback
- Logout redirect URI: http://localhost:8080
Write down your client id and client secret.
Create a file with the name testenv and add the following values:
ISSUER=https://<YourOktaURL>/oauth2/default
CLIENT_ID=123xxxxx123
CLIENT_SECRET=1234XXX
Run your application with:
npm run custom-login-server
Now navigate to http://localhost:8080 in your browser.
If you see a homepage that prompts you to login, then things are working! Clicking the Log in button will render a custom login page, served by the Express application, that uses the Okta Sign-In Widget to perform the authentication.
Note: If you are currently using your Okta Tenant, you already have a Single Sign-On (SSO) session for your Org. You will be automatically logged into your application as the same user that is using your Okta Tenant. You may want to use an incognito tab to test the flow fully.
If you go to My Profile in the left menu, you should see the data provided by Okta.
Customization of your sign-in widget can be done by editing the file common/views/custom-login.mustache
Sign-in Widget with Social Login with custom redirect
Using a social login provider for authentication is a good way to enhance user experience in B2C scenarios. In this section we will set up social authentication with Facebook and the custom hosted sign-in widget and configure the redirect routes.
Your configuration for the sign-in widget in the file common/views/custom-login.mustache will currently look like:
const signIn = new OktaSignIn({
baseUrl: '{{{baseUrl}}}', // e.g. https://dev-1234.oktapreview.com
});
To enable a button for Facebook, you need to add the configuration option idps:
const signIn = new OktaSignIn({
baseUrl: '{{{baseUrl}}}', // e.g. https://dev-1234.oktapreview.com
idps: [
{type: 'Facebook', id: 'IdpIdFromFacebook'}
]
});
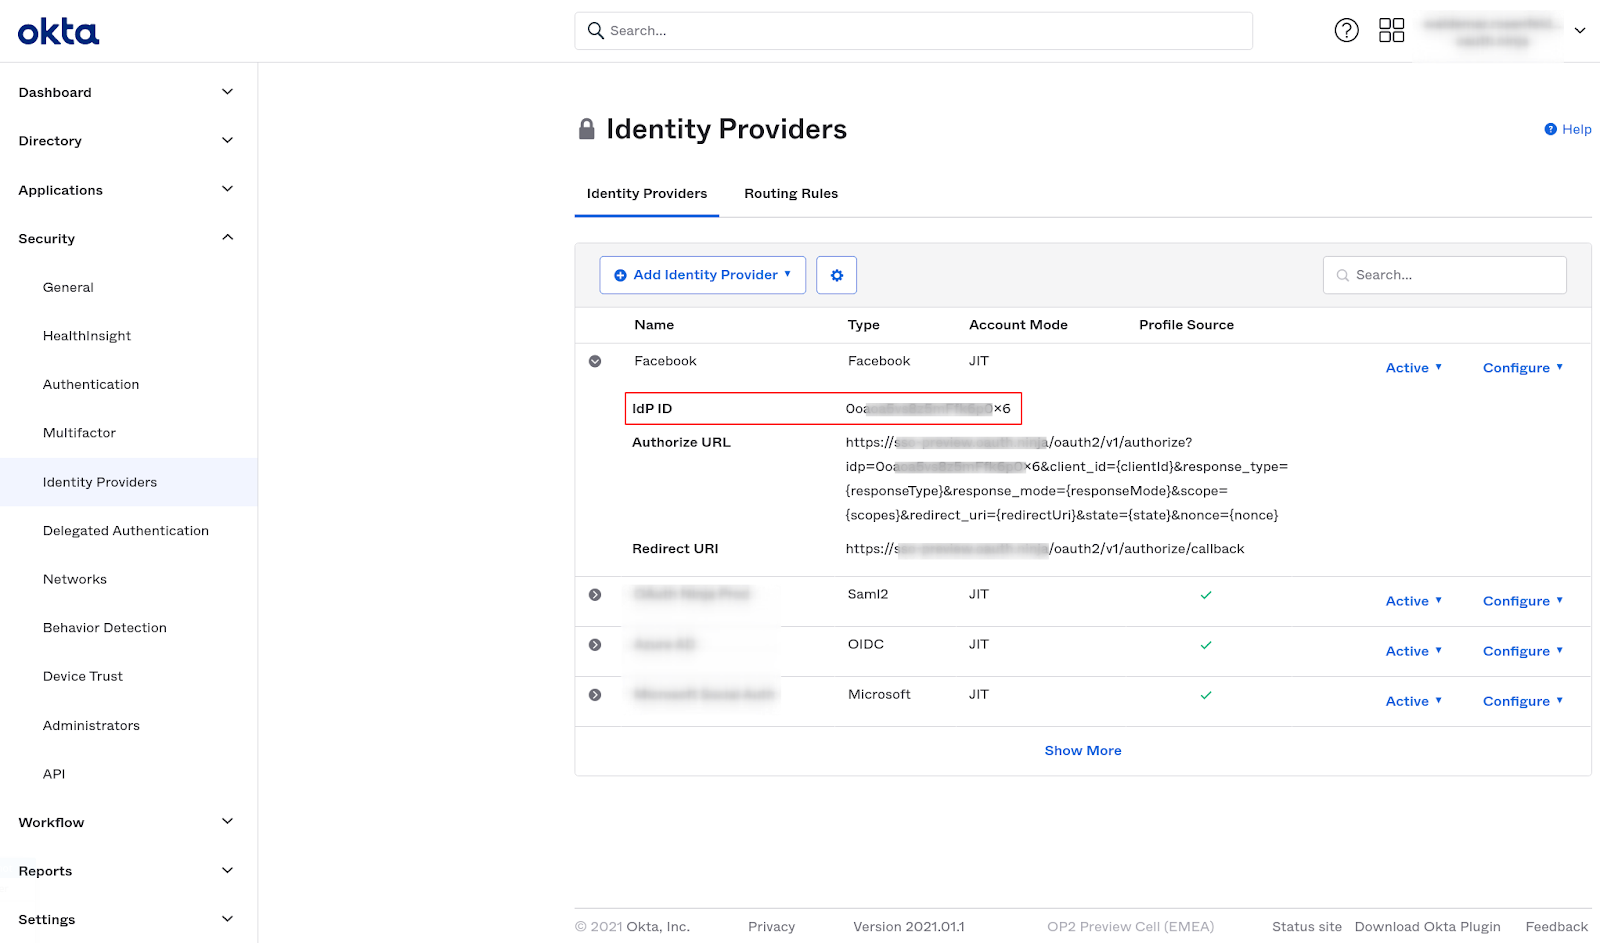
You can find your IdP ID in your Admin Dashboard from your Okta Tenant in the section
Security → Identity Providers
Restart your application and the Login screen will look like this:
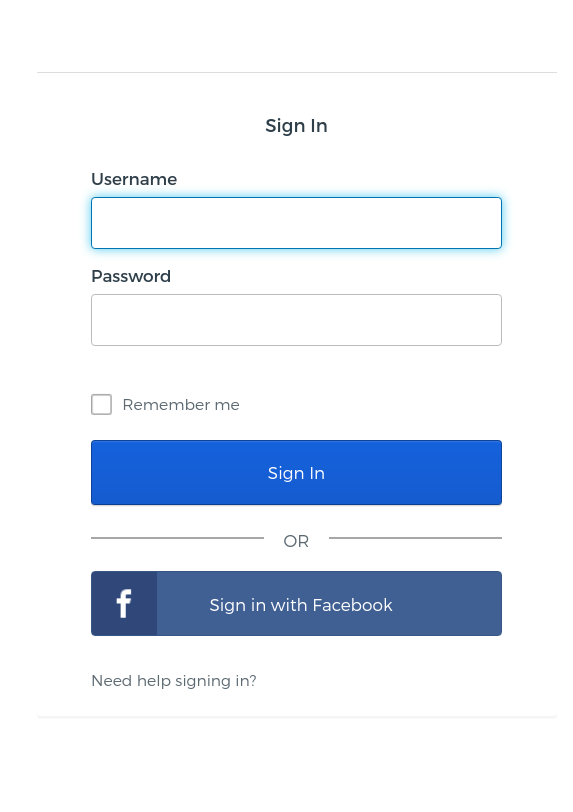
If you use Facebook to login, you will not be redirected to your NodeJS example application. Instead, the browser will show you the End User Dashboard from Okta. To have a proper redirect back to your application, you will need to configure the option “relayState” as shown below:
const signIn = new OktaSignIn({
baseUrl: '{{{baseUrl}}}', // e.g. https://dev-1234.oktapreview.com
relayState: 'http://localhost:8080/authorization-code/callback',
idps: [
{type: 'Facebook', id: 'IdpIdFromFacebook'}
]
});
Try to sign-in again with Facebook, and your browser should redirect you back to the sample application.
Using a custom domain
If you are using a custom domain, please make sure that the settings for the IdP and authorization server both show the same domain. If this is not configured correctly, cookies can't be exchanged properly in the authentication, and your user is required to authenticate again, after the redirect back from Facebook.
- Facebook IdP settings in Okta
- Go to Security → Identity Provider
- On the Facebook item click on Configure → Configure Identity Provider
- Redirect Domain: Custom URL
- Authorization Server
- Go to Security → API
- Edit your authorization server (if you followed the guide above: default)
- Click on Edit
- Issuer: Custom URL
Sign-in Widget with IDP Discovery with custom redirect
One great feature of Okta for B2B use cases is to enable business partners to bring their own IdP (Bring-Your-Own-Identity). To enable a great user experience, it is necessary to use Okta's routing rules feature, to automatically detect which IdP the user belongs to. The sign-in widget allows you to use this functionality in custom built portals. This requires proper setup with the right redirect after final authentication in the target IdP.
Additional prerequisites:
- Set up an external identity provider (e.g. a second Okta tenant or Azure AD).
See here how to add an external idp: https://developer.okta.com/docs/guides/add-an-external-idp/oktatookta/create-an-app-at-idp/ - Create one or more routing rules: https://developer.okta.com/docs/concepts/identity-providers/#idp-discovery
Example of a routing rule:
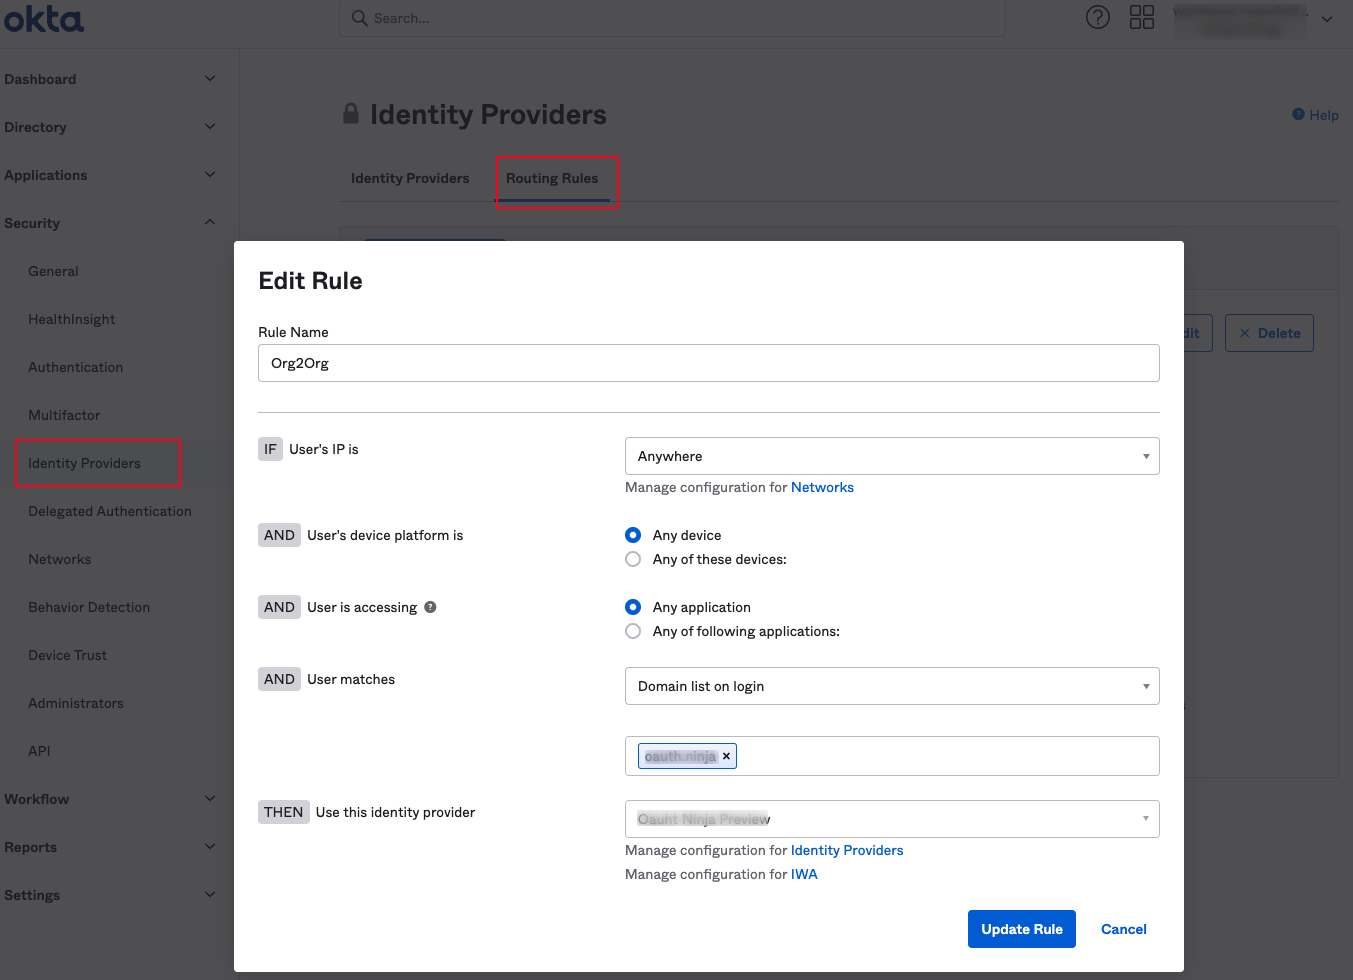
In this section we will set up the routing feature and the custom hosted sign-in widget and configure the redirect routes. Your configuration for the sign-in widget in the file common/views/custom-login.mustache is currently:
const signIn = new OktaSignIn({
baseUrl: '{{{baseUrl}}}', // e.g. https://dev-1234.oktapreview.com
});
To enable routing rules, you just need to enable this feature:
const signIn = new OktaSignIn({
baseUrl: '{{{baseUrl}}}',
features: {
idpDiscovery: true
}
});
After restarting the sample application, your sign-in widget will look like this:

As you probably noticed, the password field disappeared. This is necessary, because the user probably doesn't have a password for Okta, but only in the target IdP.
If you are now using this feature to login, you will not be redirected to your NodeJS example application. Instead, the browser will show you the End User Dashboard from Okta. To have a proper redirect back to your application, you need to configure the “requestContext” option as shown below:
const signIn = new OktaSignIn({
baseUrl: '{{{baseUrl}}}', // e.g. https://dev-1234.oktapreview.com
features: {
idpDiscovery: true
},
idpDiscovery:{
requestContext: 'http://localhost:8080/authorization-code/callback'
}
});
The next time, you try to sign-in with an external IdP, your browser will redirect you back to the sample application.
Email verification with custom redirect
Using Okta to send an email is an easy way to initiate communication with your users. A use case for this is to send out verification emails. In sending emails, Okta doesn't know the context, the user is in that moment. So the target is always Okta's End User Dashboard. Seeing the Dashboard in CIAM use cases can be confusing for the user. So it is best practice to redirect the user automatically to the application after using the link from the Email.
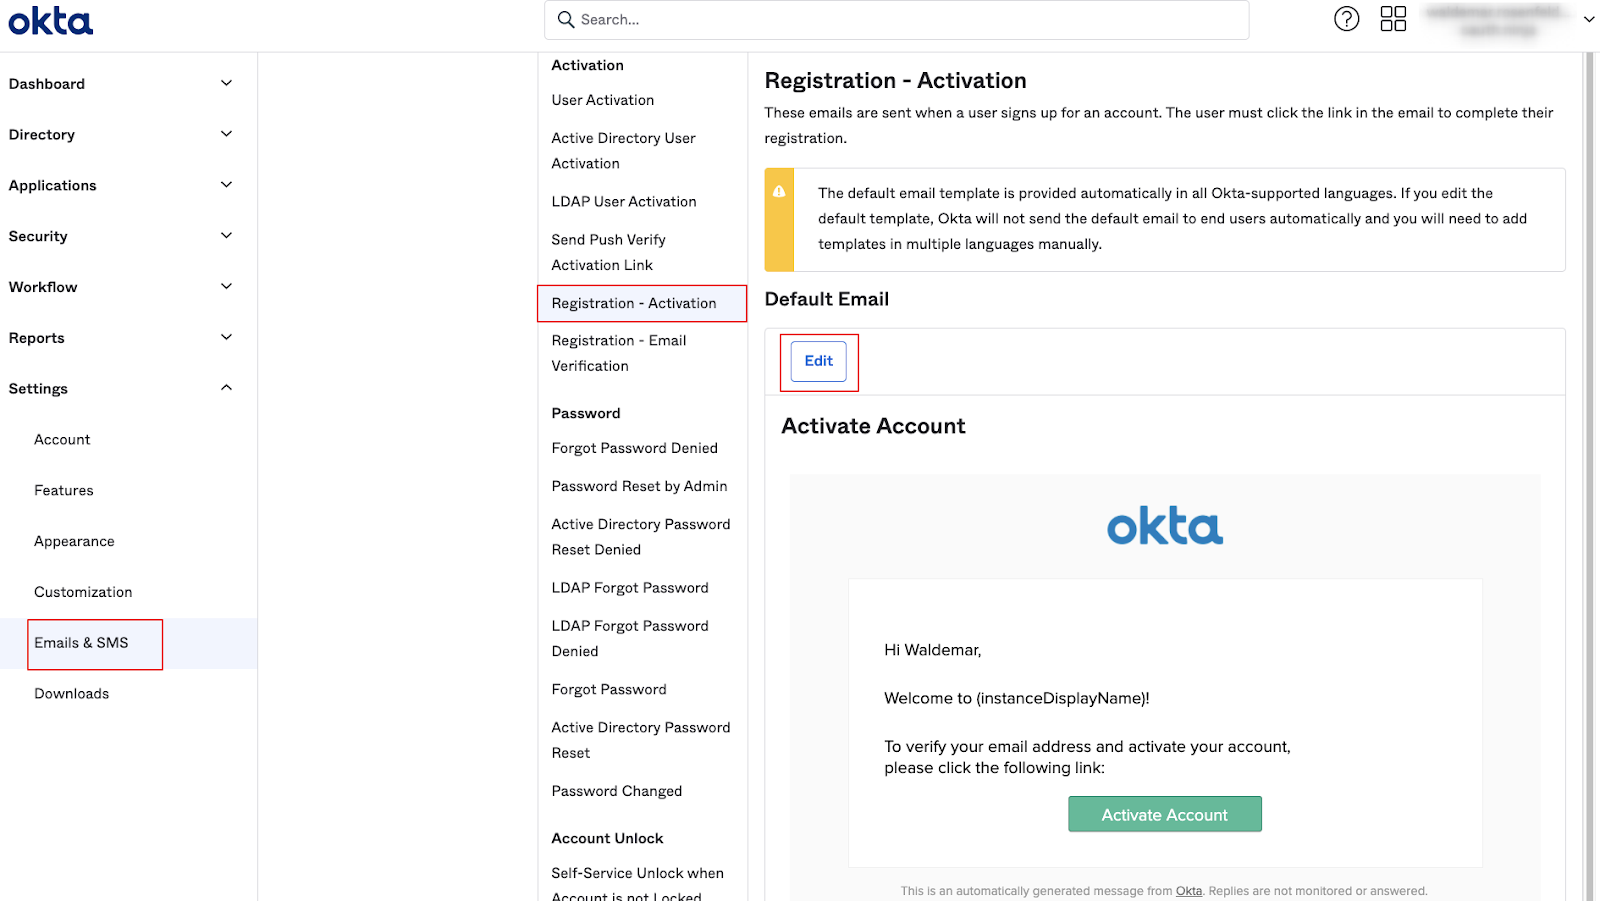
You can set up your email templates in Settings → Emails & SMS → Email. In this example we will change the template for Registration - Activation.
In this example, the standard HTML code for the link will look like this:
<tbody>
<tr>
<td style="padding-top:24px;vertical-align:bottom"> Hi $StringTool.escapeHtml($user.profile.firstName), </td>
</tr>
<tr>
<td style="padding-top:24px"> Welcome to $instanceDisplayName! </td>
</tr>
<tr>
<td style="padding-top:24px"> To verify your email address and activate your account, <br /> please click the following link: </td>
</tr>
<tr>
<td align="center">
<table border="0" cellpadding="0" cellspacing="0" valign="top">
<tbody>
<tr>
<td align="center" style="height:39px;padding-top:24px;padding-bottom:8px"><a id="registration-activation-link" href="$registrationActivationLink" style="text-decoration:none"><span style="padding:9px 32px 7px 31px;border:1px solid;text-align:center;cursor:pointer;color:#fff;border-radius:3px;background-color:#44bc98;border-color:#328c71 #328c71 #2f856b;box-shadow:#d8d8d8 0 1px 0">Activate Account</span></a> </td>
</tr>
</tbody>
</table>
</td>
</tr>
</tbody>
Or specifically the button:
<td align="center" style="height:39px;padding-top:24px;padding-bottom:8px"><a id="registration-activation-link" href="$registrationActivationLink" style="text-decoration:none"><span style="padding:9px 32px 7px 31px;border:1px solid;text-align:center;cursor:pointer;color:#fff;border-radius:3px;background-color:#44bc98;border-color:#328c71 #328c71 #2f856b;box-shadow:#d8d8d8 0 1px 0">Activate Account</span></a> </td>
To redirect to your application, add a redirect uri to the link:
<td align="center" style="height:39px;padding-top:24px;padding-bottom:8px"><a id="registration-activation-link" href="$registrationActivationLink?fromURI=http://localhost:8080/authorization-code/callback" style="text-decoration:none"><span style="padding:9px 32px 7px 31px;border:1px solid;text-align:center;cursor:pointer;color:#fff;border-radius:3px;background-color:#44bc98;border-color:#328c71 #328c71 #2f856b;box-shadow:#d8d8d8 0 1px 0">Activate Account</span></a> </td>
For better visibility, just the href part:
href="$registrationActivationLink?fromURI=http://localhost:8080/authorization-code/callback"
With the ?fromURI=targetURL part in the link, the user will be automatically redirected to the page http://localhost:8080/authorization-code/callback after using the link from the email.
