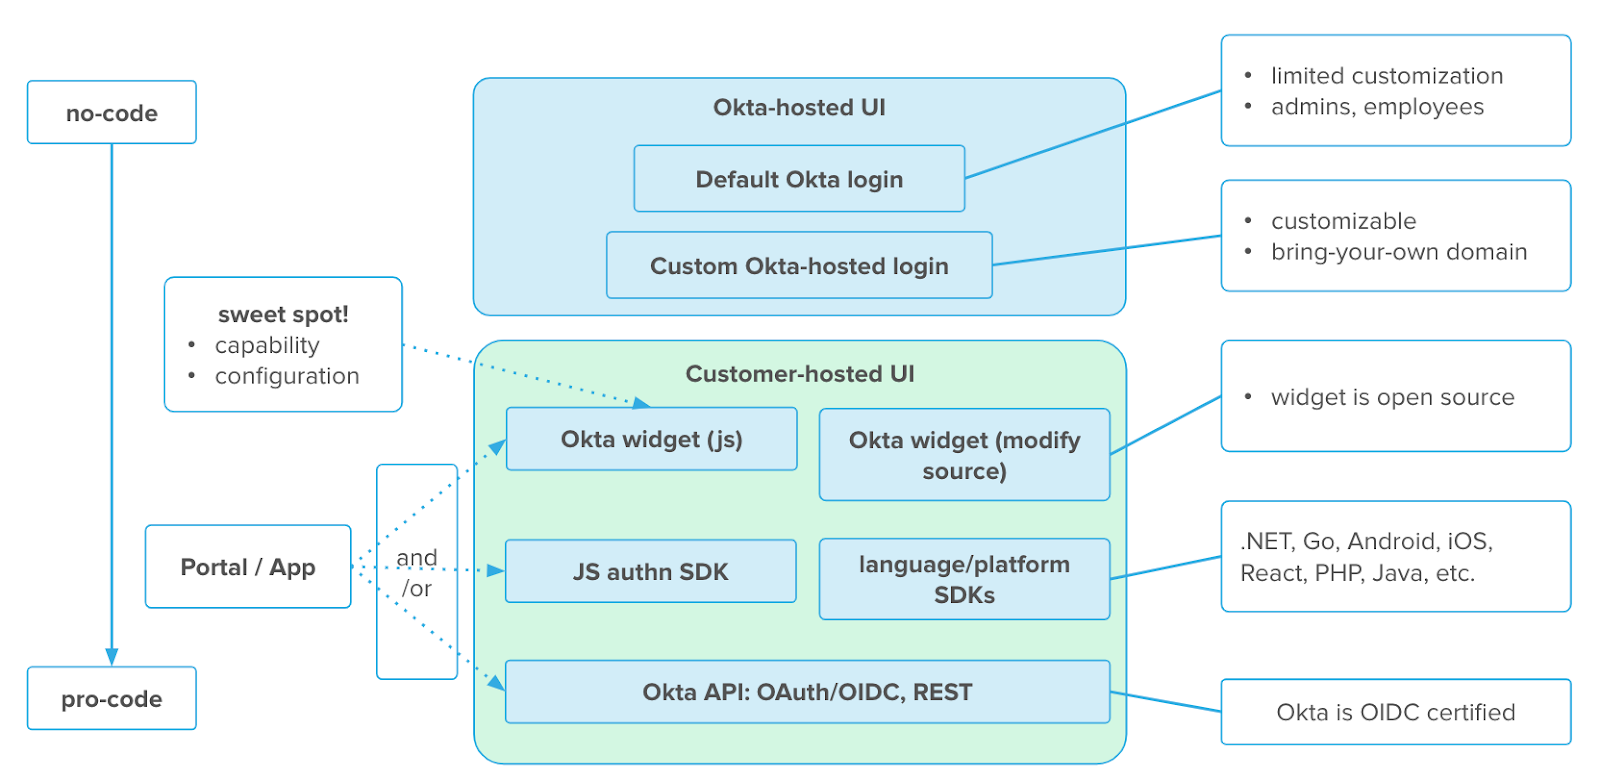
B2C and B2B typically have one common use case: A custom portal or custom application. Okta provides several ways to enable authentication for your application:
- No-Code with the Okta hosted sign-in widget
- Low-Code with the Okta hosted sign-in widget (customized) or the custom hosted sign-in widget
A custom hosted sign-in widget from Okta is the perfect way to both reduce development effort, by using a library with a ton of pre-existing features, and at the same time having full flexibility on design and configuration. - Pro-Code by using Oktas REST API or SDKs to create a fully-customized UI
See the following diagram for details about the options:
For a better user experience, it is necessary to customize the user login and recovery flows, so a custom portal/application will be used.
This guide will focus on the password reset recovery flow and provide guidance for the following scenarios:
- Pro code: How to set up a fully custom password reset flow with the auth-js from Okta
The previous blog post already explained the low-code approach by using Okta's Sign-In widget:
- Okta hosted: Redirect back to your application after successful password reset
- Custom hosted: Use the custom hosted sign-in widget for the password reset flow and have the right redirect after a successful password reset
Custom password reset page
Instead of using the sign-in widget from Okta, you can use a pro-code option and build a full-custom password-reset flow for your user. For this you can either use Okta's REST-APIs or take the help of the SDKs.
This guide will show you how you can achieve this by using the auth-js library here: https://github.com/okta/okta-auth-js
This guide will focus on the self-service password reset with email as verification. You can extend this for SMS and Voice accordingly.
Note: The goal of this guide is to show you how to set up a custom password reset page. It is intended to explain the flow. Don't use this code without adding additional security mechanisms for production.
You can find the full code from this guide here: https://github.com/tux-manchot/okta-password-reset-example
Prerequisites
You will need the following things for this guide:
- An Okta org - If you don't have an existing org, register for an Okta Developer Edition here: https://developer.okta.com/signup
- A good text editor, such as Visual Studio Code
- If you are using the example with NodeJS, you need also a recent version of Node.js downloaded and installed
Setup NodeJS with Express
This guide will use a sample application with NodeJS and Express. To do this create a folder, a file called app.js and execute the following commands:
npm init
npm install express @okta/okta-auth-js
These commands will set up the initial structure of this project and install the necessary libraries Express and Okta's auth-js.
Enter the following in the file app.js:
const express = require('express');
const app = express();
app.use(express.urlencoded({ extended: true }));
var OktaAuth = require('@okta/okta-auth-js').OktaAuth;
var authClient = new OktaAuth({
issuer: 'https://YourOktaURL'
});
let port = process.env.PORT || 3000;
app.listen(port, () => console.log('Listening on port '+ port));
This will set up Express and Okta's auth-js. Replace the placeholder with your Okta base URL.
You can start your application by enter the command:
node app.js
Your application will successfully startet and is available on http://localhost:3000/
Index page
The next step is to provide an index page, which will ask for the username:
app.get('/', (req, res) => {
res.send(`
<h1>Forgot Password index page</h1>
<p>Did you forget your password? Enter your username and click on send.</p>
<form action="/forgot-password" method="post">
<label for="username">Username</label><br>
<input type="text" id="username" name="username" value=""><br>
<input type="submit" value="Submit">
</form>
`);
});
This will just provide a simple form to ask for the username and send this information as a POST request to the endpoint /forgot-password.
Forgot Password page
The forgot password page will receive the entered username and start the recovery process by using the function forgotPassword() from auth-js:
app.post('/forgot-password', (req, res) => {
console.log(req.body.username);
if(req.body.username){
let username = req.body.username;
authClient.forgotPassword({
username: username,
factorType: 'EMAIL'
}).then(function(transaction){
if(transaction.status == 'RECOVERY_CHALLENGE'){
res.send(
'<p>A link was sent to your email. Please click on that link to reset your password.</p>'
);
} else {
res.send(
'<p>Something went wrong, please contact your Administrator.</p>'
);
}
}).catch(function(err) {
console.error(err);
});
} else {
res.send('<p>something went wrong</p>');
}
});
Note: This example will use Email as the factor, you can change this for SMS or Voice accordingly.
If successful, your user will receive an email with the recovery link. Proceed to customize the email template, so that the user will receive a link with this application as its target.
If this is not successful, and the transaction.status is not RECOVER_CHALLENGE please read the section User States.
Customize Email Template
See the section "Okta Hosted with custom redirect" for guidance on how to change the email template for Password Recovery.
To redirect to your application, add a redirect uri to the link:
<td align="center" style="height:32px;padding-top:24px;padding-bottom:8px"> <a id="reset-password-link" class="${resetPasswordLink}" href="http://localhost:3000/reset-password/${recoveryToken}" style="text-decoration:none"><span style="padding:9px 32px 7px 31px;border:1px solid;text-align:center;cursor:pointer;color:#fff;border-radius:3px;background-color:#44bc98;border-color:#328c71 #328c71 #2f856b;box-shadow:0 1px 0 #d8d8d8">Reset Password</span></a> </td>
So the Link will look like this:
class="${resetPasswordLink}" href="http://localhost:3000/reset-password/${recoveryToken}"
Note: It is not possible to save the template without the value ${resetPasswordLink}, so this information needs to be present.
Reset Password page
The reset password page needs two things:
- Accept with a GET request the recovery token from Okta and ask the user for the new password
- Start the password reset process by providing Okta the recovery token and the new password
First accept the recovery token and request a new password:
app.get('/reset-password/:recoveryToken', (req, res) => {
if(req.params.recoveryToken){
let recoveryToken = req.params.recoveryToken;
res.send(`
<form action="/reset-password" method="post">
<label for="password">Enter new Password</label><br>
<input type="password" id="password" name="password" value=""><br>
<input type="hidden" id="recoveryToken" name="recoveryToken" value="${recoveryToken}">
<input type="submit" value="Submit">
</form> `
);
} else {
res.send('<p>something went wrong</p>');
}
});
This will not check the recovery token, this code will just verify that a token was provided. After providing an new password, the token will be reviewed together with the password with the verifyRecoveryToken() method from Okta's auth-js:
app.post('/reset-password', async (req, res) => {
if(req.body.recoveryToken && req.body.password){
let recoveryToken = req.body.recoveryToken;
let password = req.body.password;
authClient.verifyRecoveryToken({
recoveryToken: recoveryToken
}).then(function(transaction) {
transaction.resetPassword({
newPassword: password
});
res.send('<p>Password reset successfully</p>')
}).catch(function(err){
console.error(err);
});
} else {
res.send('<p>something went wrong</p>');
}
});
If the password reset is successful, you will see a success message.
User States
If you are using Okta's sing-in widget (Okta hosted or custom hosted), then the widget will handle the different user states and provide functionality to show the user information about how to act. See the following diagram for an overview of all possible transactions states:
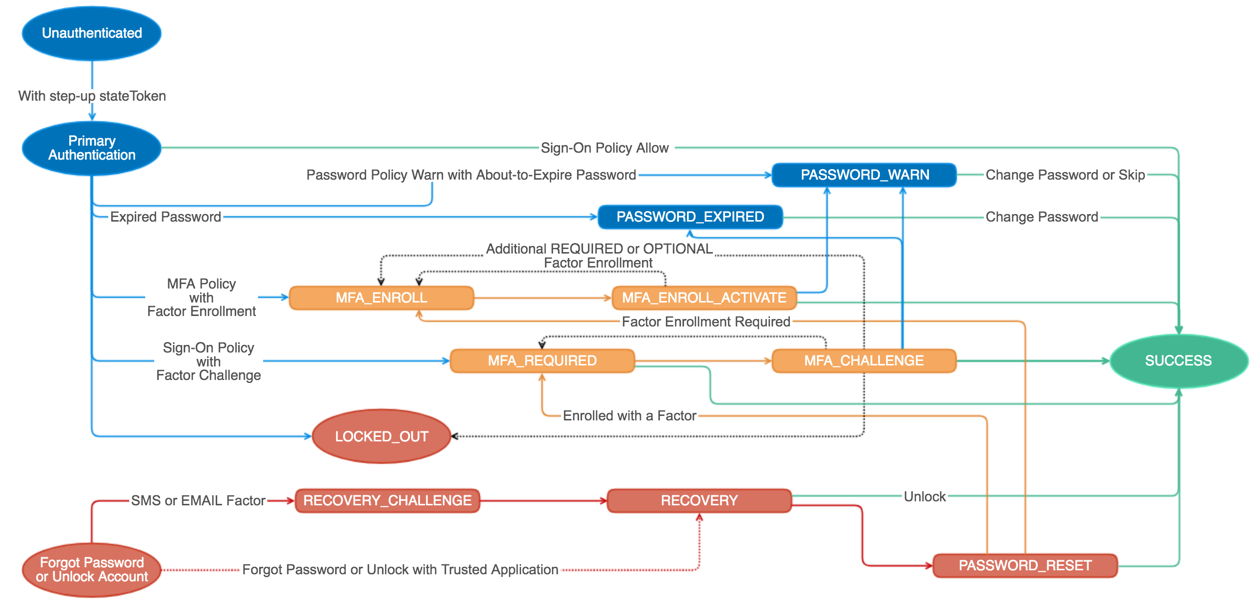
You can find a description of all states here: https://developer.okta.com/docs/reference/api/authn/#transaction-state
If you create your own sign-in pages and flows, you will need to handle these states and add logic to react to them. This guide focuses on password reset transactions and therefore will only handle the red parts of the above picture.
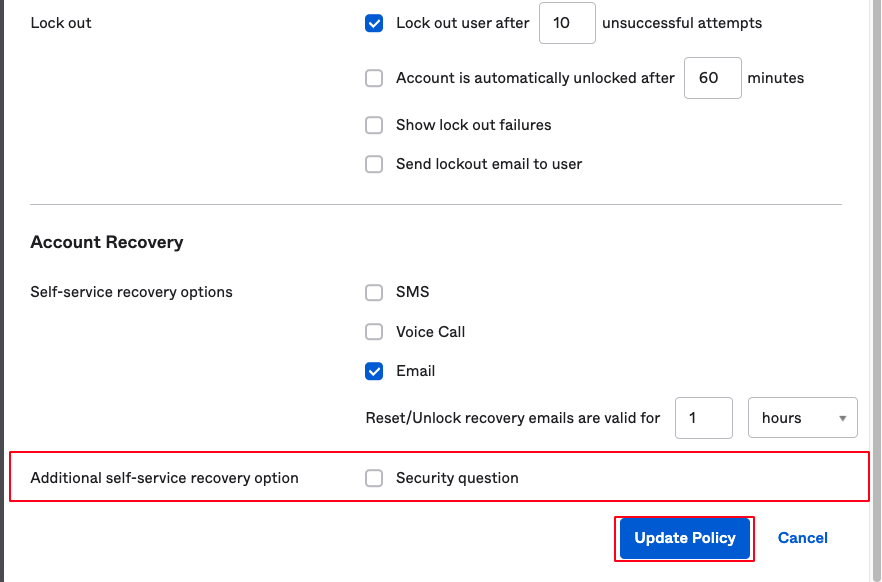
Typical challenges that often occur around the Security Question:
- If the user never set up a security question, a password reset can not be done. Instead the user will receive an email that the administrator should be contacted.
- If the user has a security question in the profile saved and you want to reset the password with the recoveryToken and the new password, but without providing the answer for the security question, you will get the following error message:
TypeError: transaction.resetPassword is not a function
To fix this ask the user additionally for the security question. To do this you need to send a POST request to the next link relation to answer the user's recovery question.
If you don't need a security question at all, you can ask Okta Support to enable the feature flag DISABLE_SECURITY_QUESTION_FOR_RECOVERY. After that you can go in your Admin Dashboard to Security → Authentication → Password. Edit your Password Policy and disable the security question at the bottom.